Focusable parabolic reflector
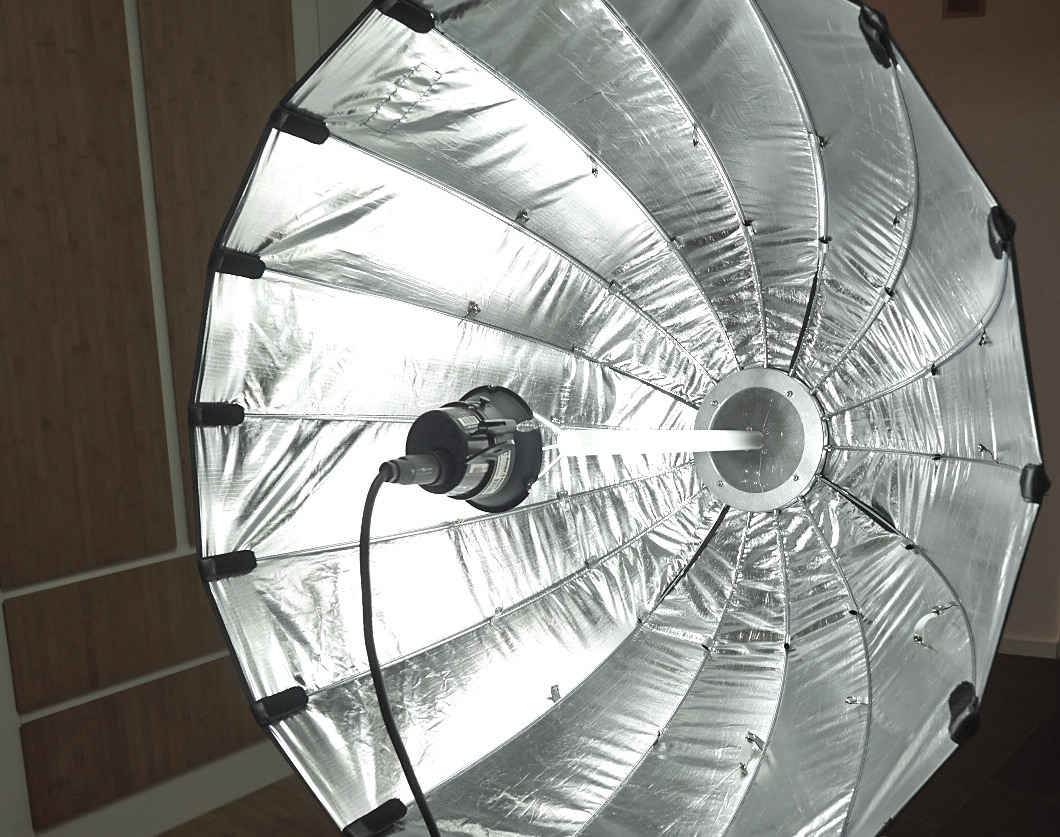
Why the tube
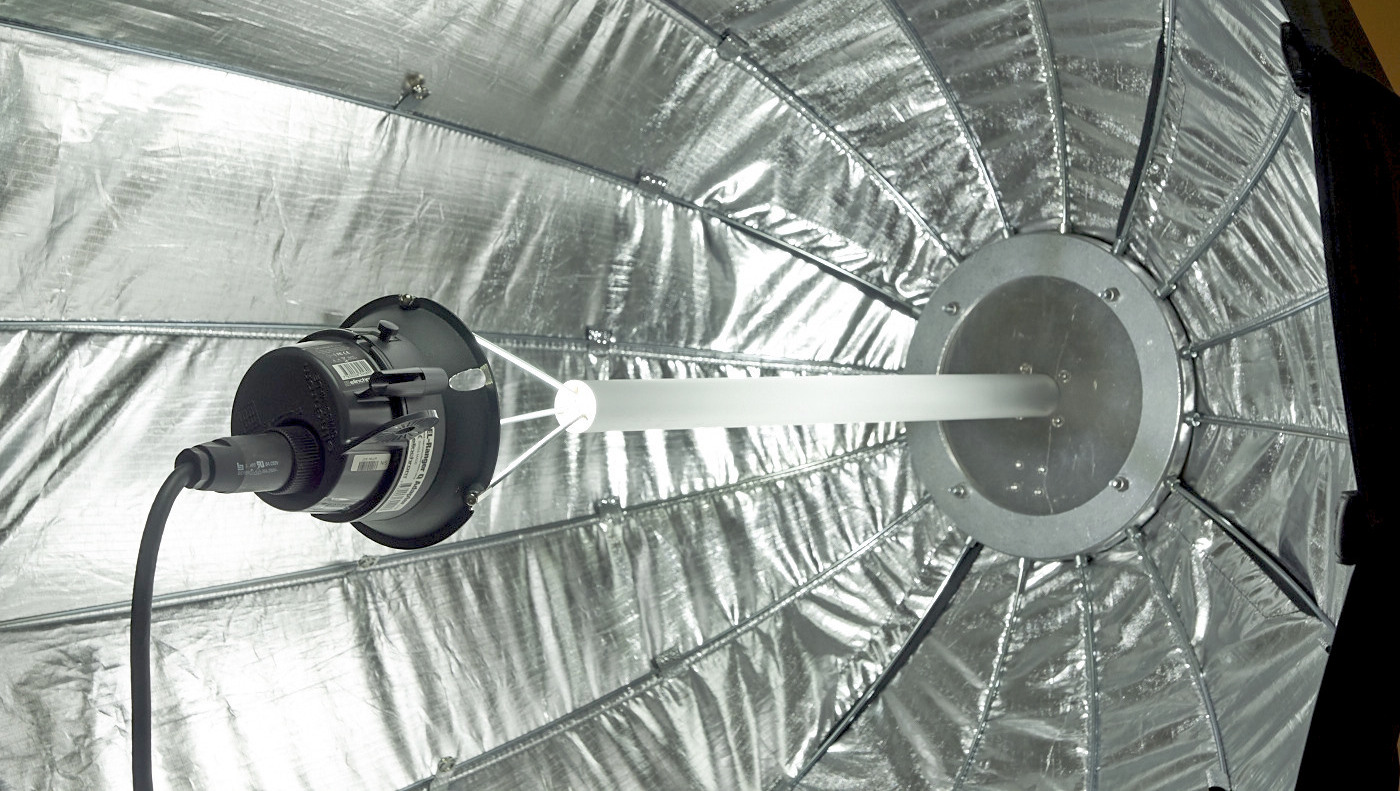
When using a softbox, the flash is usually mounted in the speedring. That would put it into the vertex, which is obviously not what we want. To be able to move the flash head in (towards the vertex) and out (away from the vertex) of the reflector, we need a tube. And we need to
- mount the flash at one end of the tube, facing the tube, and
- mount the tube in the speedring and make it slidable
Attaching a bayonet mount
I decided to use a real bayonet (as opposed to clamps or tie wraps) for flexibility and easy (dis)assembly. My flash of choice for this reflector is the Elinchrom Quadra. I considered using a Lastolite Quadra plate for this purpose, but finally opted for the bayonet part of an RQ-EL adaptor that I had taken apart. That part comes with a very short reflector.
Note that although it looks bigger on the photo, that reflector is a mere 17mm (⅝") deep - considerably shorter than even the small standard reflector. Thus it merely shields direct light from the subject but does not do much in terms of directing the light. That's just what we need.
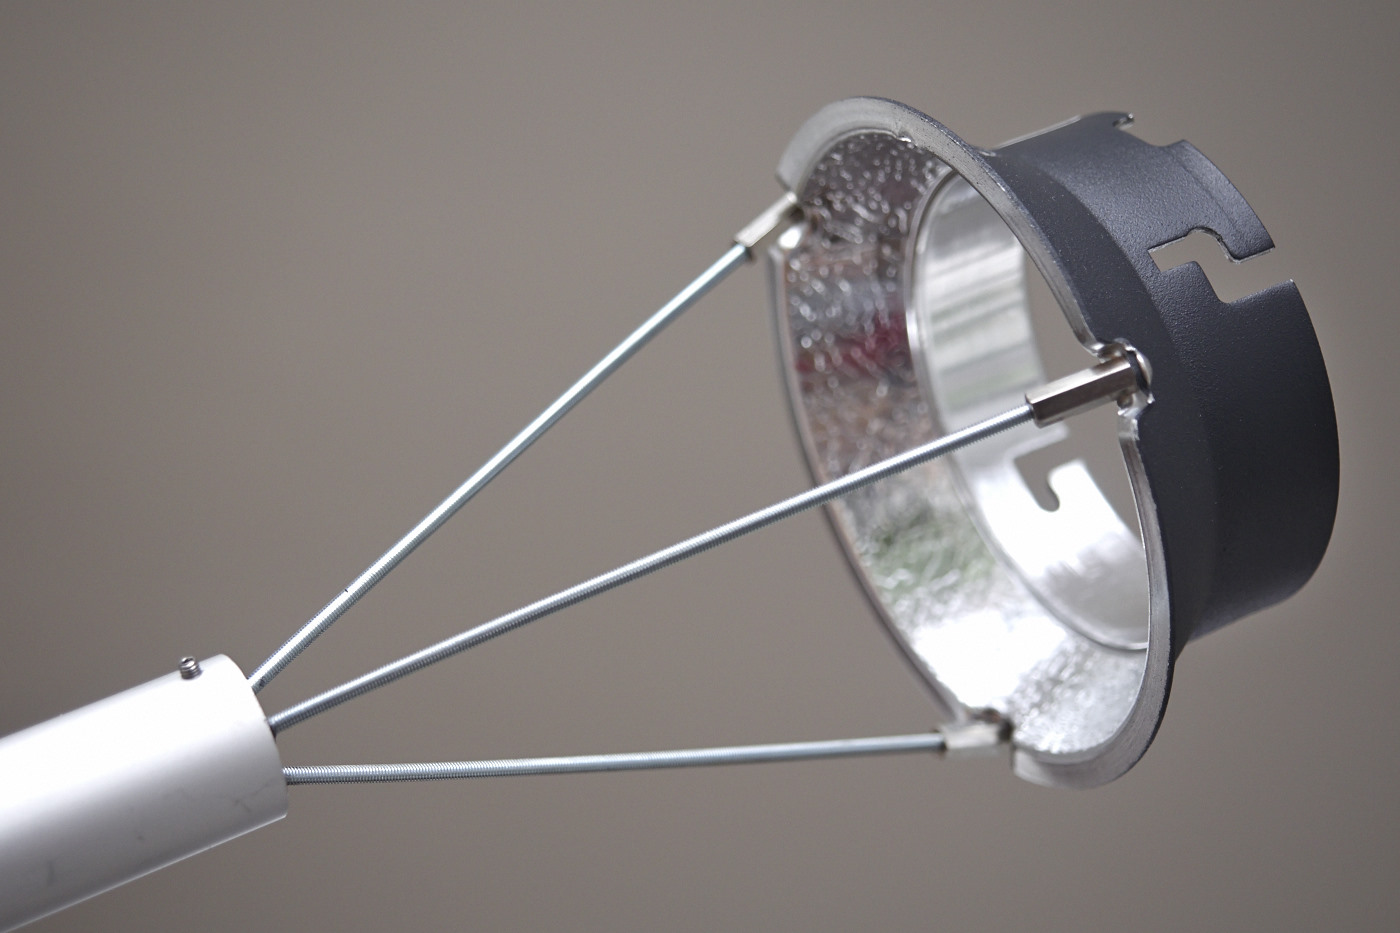
Of course, the mount needs to face backwards, into the reflector. And of course it needs to be "in the middle" (on the axis). To attach it, I used three threaded rods with M3 threads. I could have simply fixed them on the bayonet with two nuts each, but instead I opted for bolts with an inner thread and additional screws through the bayonet into the bolts. That allows me to fine-adjust the length of each rod by turning the bolts.
To attach the rods to the tube, I used a round piece of wood that I shoved into the tube (after widening the tube just a tiny bit with a hot air gun). I drilled three diagonal holes into the wood and screwed the rods in place, with a little bit of glue to be sure.
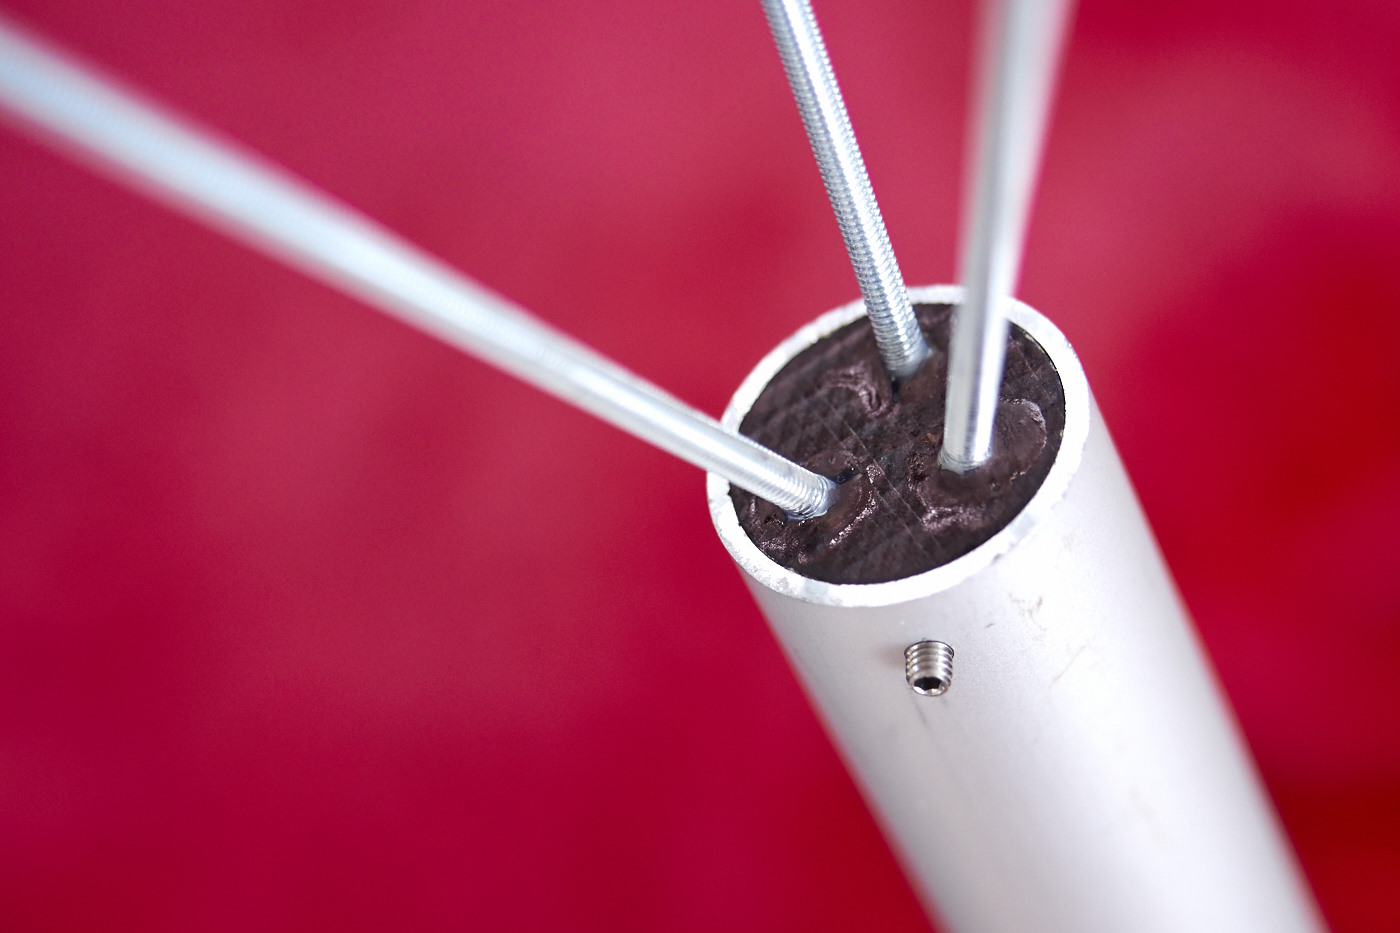
Notice the little screw sticking out from the wall of the pipe. That one has nothing to do with the wood or the rods. I added this screw as a stop. When sliding the tube far in, the screw hits the speedring and prevents the tube from accidently sliding too far and falling through.
Speaking of sliding - let's look at:
How others slide the tube
First, I had a look at similar projects by others:
-
el_mambo has made a round disc out of teflon that (thanks to a few screws) fits into an Elinchrom bayonet. It has a round hole in the middle within which the tube is installed.
-
Oliver Krause disassembled a Bowens mount and attached a wooden disc to it, also with a hole.
-
Detlef G. followed the same approach
-
Mikrosat have a commercial Bowens adaptor similar to Oliver's and Detlef's, but of solid metal. (I bought that one - it's very sturdy but ridiculously heavy. That was a no-go for use on location)
All of the above solutions have one thing in common: they mount into the existing speedring adapter, so there are four connected pieces: 1. the speedring, 2. the insert for the speedring (with a manufacturer specific bayonet), 3. the disc (with a bayonet mount to mount the insert), 4. the tube that goes inside the disc. Pretty complex! So let's make:
A simpler and lighter tube guide
There is no need for a bayonet mount in that speedring if you don't intend to mount a flash to it. Therefore I went for a simpler solution: instead of making a disc with a bayonet mount, I decided to make a bigger disc that replaces the insert altogether and mounts right into the speedring with the four screws.
Thus I CNC-milled a round disc out of aluminum with the outer dimensions of a typical speedring insert: 145mm diameter. (some manufacturers have smaller or bigger inserts, but this seems to be the most wide-spread size)
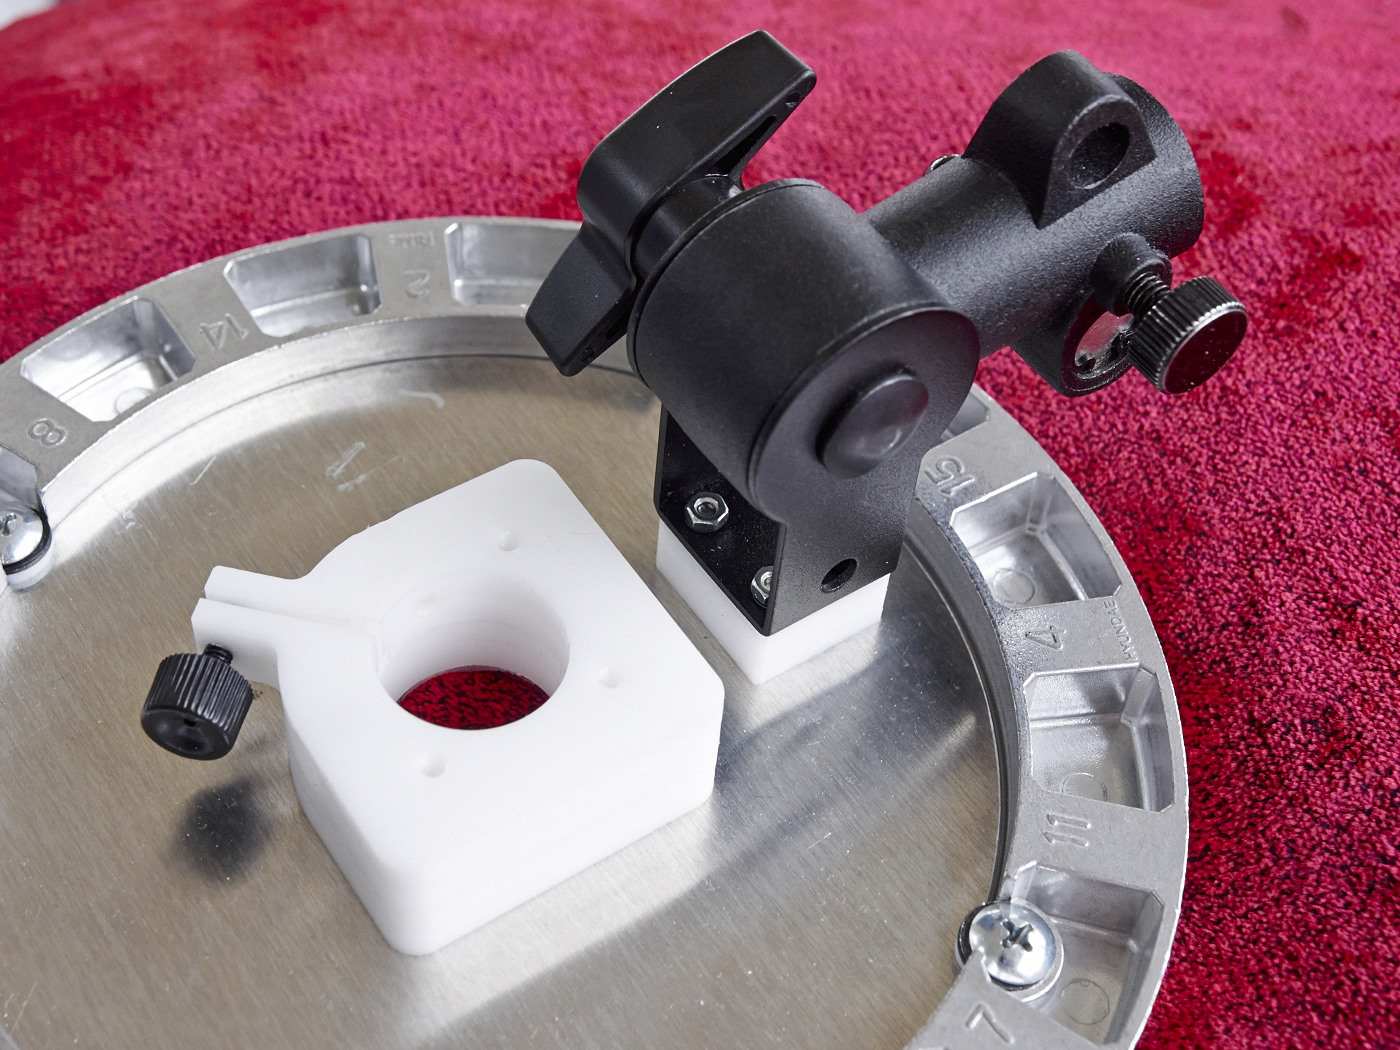
Next task: make a guide to fit the tube. Much to my delight, Stefan at FabLab Berlin gifted me a few left-over pieces of Polyoxymethylene (POM). POM is known for its low friction - which is just what I needed. I CNC-milled a rounded rectangular shape with a round hole in it (with the diameter of my tube), and I screwed two layers of that onto my aluminum disc.
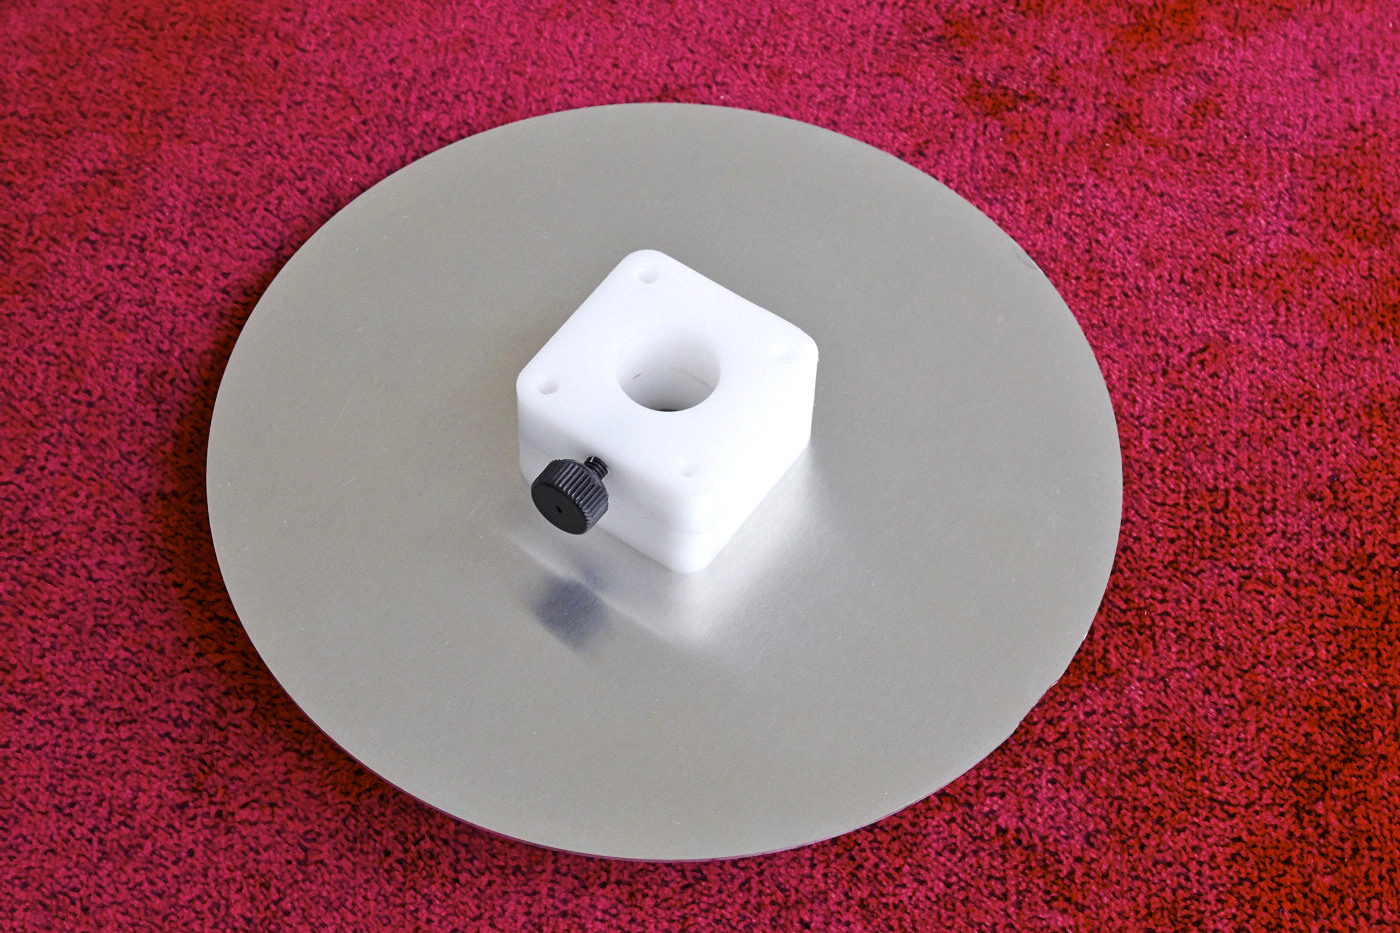
In order to hold the tube in place when you don't want to slide it, I drilled a 2.5mm hole into the side of the POM part and cut an M3 thread into it. Now I can use a knurled head screw to lock the tube in place. (More about that screw see below)
Now the insert can be put into the speedring and held in place with the supplied four screws. And we can also insert the tube:

How to put it on a light stand
Sounds easy. But it actually is tricky, because the obvious solution is flawed. Since there is no spigot bolt or thread on the speedring, the first thought that naturally comes to mind is working with the tube that so nicely sticks out the back of the speedring. One could use a dual grip clamp (like you would for a boom):
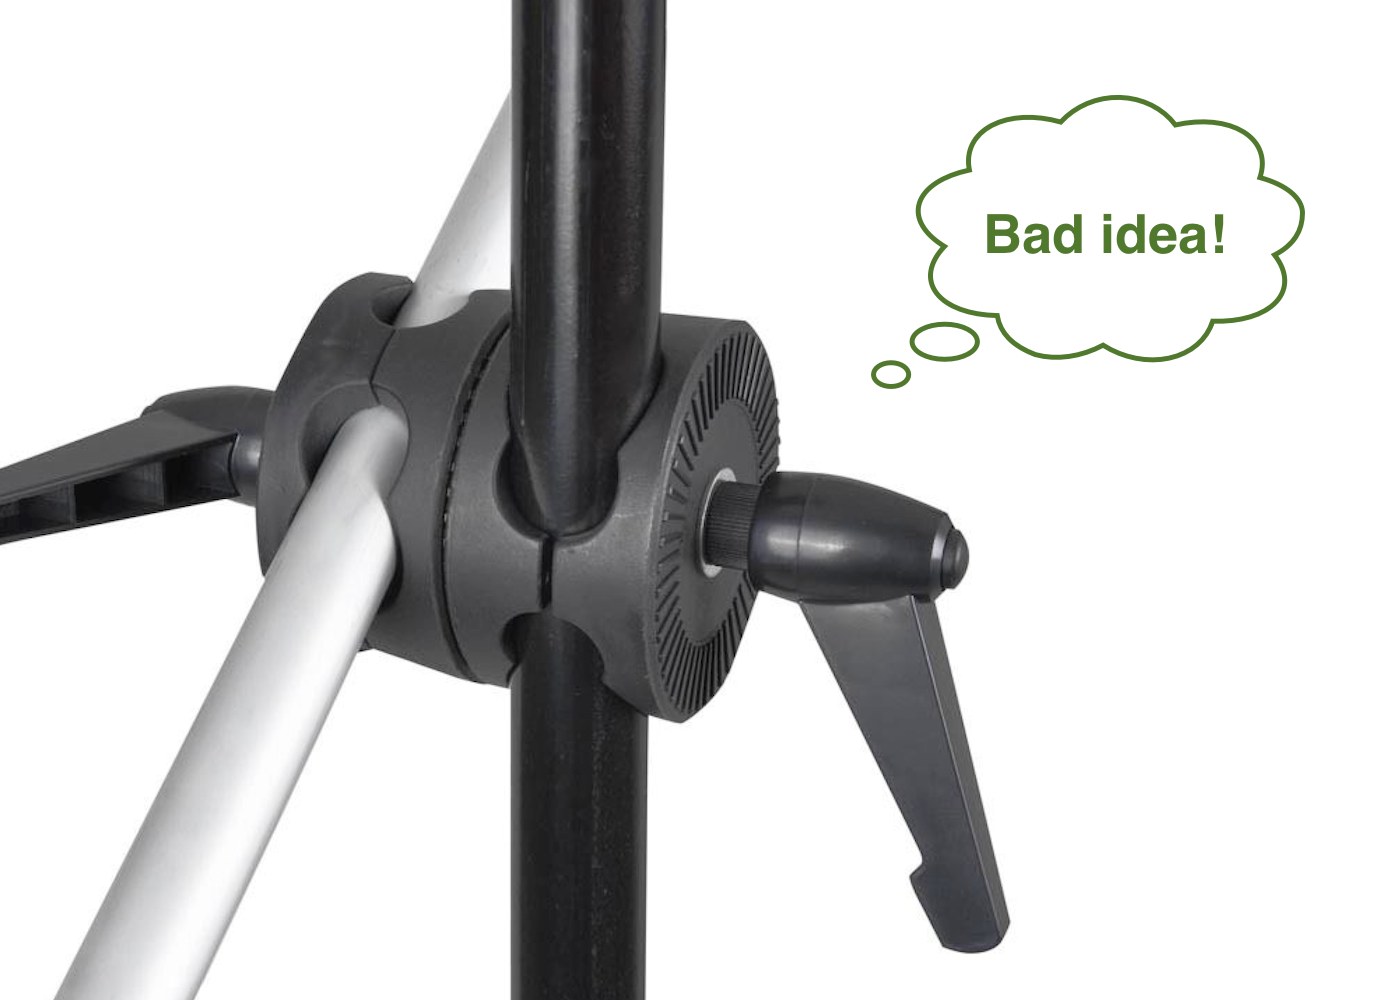
The problem with this approach is that it makes focusing the reflector very cumbersome. After all, focusing is done by sliding the tube in and out of the speedring. But that would move the whole softbox, because the tube is fixed. So if you want to keep the softbox in the same place, you have to not only slide the tube in the speedring, but also re-adjust the grip clamp to a different position on the tube. That's a big hassle - therefore it was not an option for me.
Update: As Oliver just pointed out, I missed the fact that he is using a cut-off tripod in the clamp, so the boom arm itself is extensible (tube in tube) and does allow him to focus without changing the position. Very smart approach!
Another option I discarded is this one:

A speedring with a built-in tilting mechanism! (made by Aurora / Hensel). It's a great product as long as you only use it in the studio, or if your assistant carries it for you. For the rest of us, this piece of equipment is simply too heavy and too bulky. I ordered one, but I instantly returned it too the store, since it would have tripled the weight of my reflector and taken more space than two flash generators including batteries. Mind you, it's also quite deep (which the photo doesn't show).
As a solution, I disassembled one of those cheap swivel mounts with hotshoe that you can get from China for $10. There is a huge variety available, but note that some are more sturdy than others. After all, these swivels are designed to carry just a speedlite and a simple umbrella. If you want to put more weight on them, you first need to find a sturdy enough model. Those (see below) are fine:
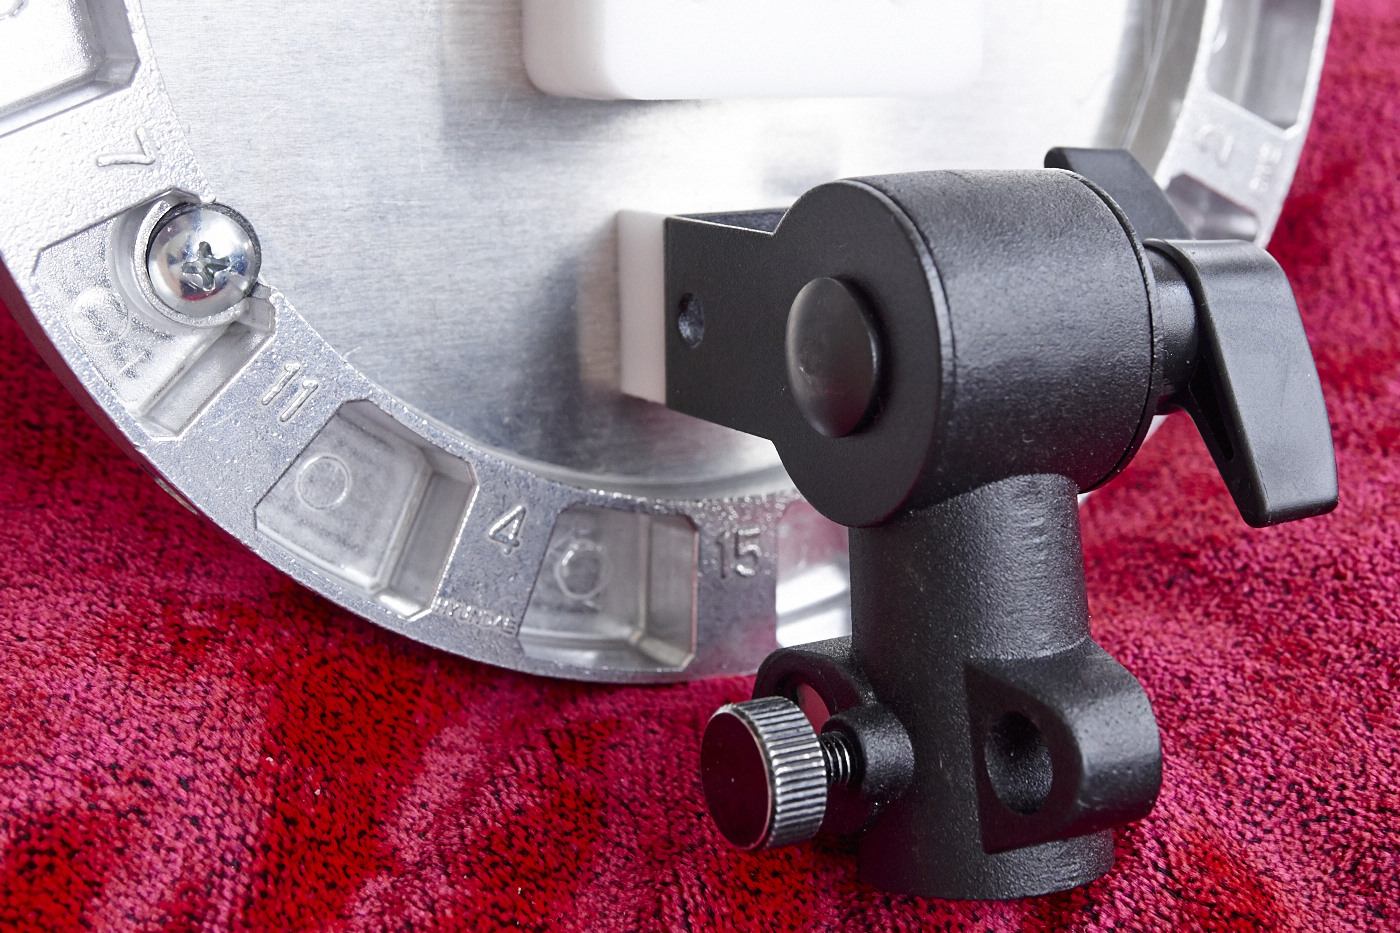
It originally came with a hotshoe, which I removed. Instead I added the white plastic you can see on the picture (CNC milled from 12mm POM) as a spacer. That allows the swivel to tilt full way without prematurely hitting the speedring. I Attached it to my custom speedring insert with four M3 screws and voilà - the reflector can now be mounted on a light stand, tilted, and independently focused.
By the way, the softbox I used for this is the 90cm Grandbox by RimeLite. I conducted an extensive comparison of three softboxes before settling for this one.
Alternative tube guide
I was worried that the screw which I use to hold the tube in place may damage the tube. If it makes a dent in the tube (so far my reasoning), maybe the tube will jam in its guide and not slide smoothly anymore. Therefore I decided to design a different tube guide where the screw locks the tube in place by pulling the plastic tight around it (and not by pressing directly against the tube). This is what my other design looks like:
It works. But it's not really better than the previous solution. As it turned out, with this design, the screw needs 3 full rotations to lock the tube. With the screw pressing against the tube, one single rotation does the job.
I also concluded that my worries had been baseless: the screw pressing against the tube does not harm the tube, at least not in a way that would affect its slidability. I attribute this to the guide being made of plastic. When the screw is fastened, the plastic bends very slightly outwards, which is perfect to lock the tube. In that respect, an elastic material like plastic is superior to a rigid metal, because it has a higher ability to clamp.
Moral of the story: I removed the diagonal screw, drilled another hole in the side of the plastic and put the screw through that one, like in my original design.
Dimensions and learnings
While making this device, I learnt a lot about proper dimensioning that I would also like to share with you:
Tube material and diameter
I made two different tubes (as you may have noticed, the alternative mount has a bigger diameter). Both tubes are aluminum tubes from my local hardware store.
The first tube has an outer diameter of 16mm (wall thickness 1mm). That's quite thin, but it's still thick enough to work fine. The more weight you put on the tube, the more it bends. And the more it bends, the more it gets jammed in the guide and the more the flash hangs down from the center. This was not an issue with the Elinchrom Quadra head, and a speedlight would also work well. But if you are going to mount anything heavier, or if you use a longer tube in a bigger softbox, you will need a thicker tube.
The other tube is 25mm in diameter (1.5mm wall thickness). It's pretty sturdy, but it's also heavier itself. This tube would be able to carry most flash heads in this reflector. If a bigger softbox is used and thus a longer tube is required, you should consider an even bigger diameter.
Thickness of speedring insert
The Aluminum I used for the speedring insert was 1mm thick (for the 16mm tube) and 1.5mm thick (for the 25mm tube). Since the swivel is attached to this disc, the disc carries the weight of the whole device and is prone to bend. While the force does not cause any visible bends, it's enough to slightly deform the tube mount which causes the tube to glide more sluggishly. For my project 1mm is still fine, 1.5mm can't be wrong to be safe. For bigger softboxes or heavier flashes, a stiffer (thicker) insert is required.
It's really light and small
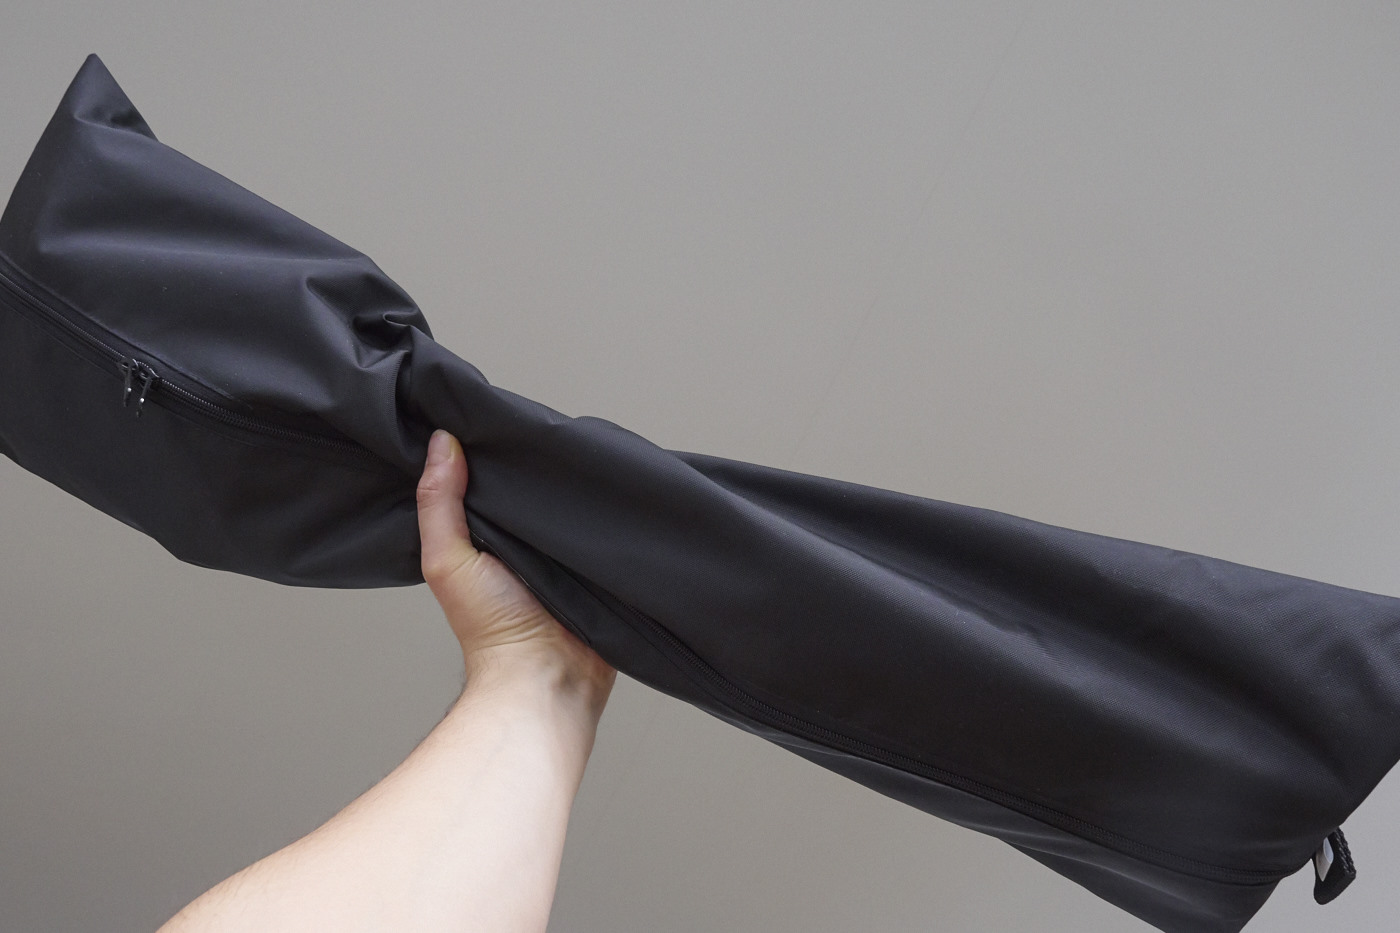
I love shooting on location, and (as long as there is no wind) this is the perfect tool: the whole device weighs only 690 grams (1½ lbs). That includes everything but the flash head: the speedring, insert, swivel, tube, mount, softbox, rods and bag. Even if you add the Quadra head, the device is still below 1kg. And it all fits nicely into the bag that came with the softbox:
First results
I was only able to use it once so far. More photos will probably come later. For more from my model shootings visit Dennis Christian Fotografie!
![Kim with parabolic main light. Rim lighting from stripbox far right behind.] (GHOST_URL/content/images/2014/May/KimOfc_266_J1400.jpg)